2. Shrink the Windows partition
Windows is like an infestation of cockroaches. Cockroaches will keep filling up space until it runs out and will try and find some more space. Windows is built to believe that all the available disk space belongs to it and therefore there is no spare space for another operating system.
To get around this issue there is a tool available within Windows that lets you shrink the Windows partition (or indeed any other partition on the disk).

To be able to shrink the Windows partition you will need to run the "Disk Management" tool. To do this move your mouse to the top right corner and click on the search icon. Now click the settings icon and start typing "disk".
Click on the option "Create and format hard disk partitions".

As you can see the Dell Inspiron by default has a busy looking disk layout.
The operating system is on drive C and is called OS.
This is the partition that needs to be shrunk in order to make space for Ubuntu.

Right clicking on the relevant drive brings up a context menu and on that context menu is the option to "Shrink Volume".
When you click on "Shrink Volume" a box appears asking you how much disk space you want to shrink the disk by.

The Shrink utility helpfully sets up the amount of disk space that it can comfortably spare.
Unless you have a reason to choose otherwise it is generally fine enough to accept the default options.
Click on "Shrink" to start the process.
Unlike the backup process this bit is quite quick.
3. Create a bootable USB drive with Ubuntu on it
Download Ubuntu
You can download Ubuntu from http://www.ubuntu.com/download/desktop.

As you can see there are two versions available.
Version 12.04 is a long term support release which means you can install it now and it will still receive updates in 4 years time. This is great if you are the sort of person who likes stability and you aren't too bothered about getting the new features early.
Version 13.04 has only 9 months worth of support and then you will be expected to upgrade to a newer version of Ubuntu. This may sound like a very short period of time (and it is) but 13.04 already feels slick compared to 12.04.
If you become comfortable with the installation process then moving up to the latest versions keeps you in the now club.
The long term support releases are great but consider that the last LTS version was back at version 10 which pre-dates Unity. To quote Ferris Bueller:
Version 12.04 is a long term support release which means you can install it now and it will still receive updates in 4 years time. This is great if you are the sort of person who likes stability and you aren't too bothered about getting the new features early.
Version 13.04 has only 9 months worth of support and then you will be expected to upgrade to a newer version of Ubuntu. This may sound like a very short period of time (and it is) but 13.04 already feels slick compared to 12.04.
If you become comfortable with the installation process then moving up to the latest versions keeps you in the now club.
The long term support releases are great but consider that the last LTS version was back at version 10 which pre-dates Unity. To quote Ferris Bueller:
The one thing you do have to do though to be able to run Ubuntu alongside Windows 8 is to choose the 64-bit version.
Note that if you have a Dell Inspiron 3521 and you wish to install version 12.04 there is a dedicated version especially for you at http://www.ubuntu.com/certification/hardware/201208-11539/.
The Dell Inspiron 3521 can be purchased pre-installed with Ubuntu and therefore there is already an image available which has all the necessary drivers set up.
I can confirm however that I installed Ubuntu 13.04 and I used the stock 64-bit download and I have had no issues with Ubuntu whatsoever.
If you live in the city then downloading Ubuntu will be a quick process. If you live in the countryside and your internet connection sucks as much as mine then there is always the option of buying a DVD pre-installed within Ubuntu Linux.

Note that if you have a Dell Inspiron 3521 and you wish to install version 12.04 there is a dedicated version especially for you at http://www.ubuntu.com/certification/hardware/201208-11539/.
The Dell Inspiron 3521 can be purchased pre-installed with Ubuntu and therefore there is already an image available which has all the necessary drivers set up.
I can confirm however that I installed Ubuntu 13.04 and I used the stock 64-bit download and I have had no issues with Ubuntu whatsoever.
If you live in the city then downloading Ubuntu will be a quick process. If you live in the countryside and your internet connection sucks as much as mine then there is always the option of buying a DVD pre-installed within Ubuntu Linux.
Download Unetbootin
Unetbootin is the tool that I used to create a bootable USB drive with Ubuntu on it. To download Unetbootin visit http://unetbootin.sourceforge.net/.
Click on the "Download (for Windows" link. The download is fairly small and even on my meagre internet connection takes under a minute.

To run Unetbootin press the "Start" button and click on "Files". Now type "Unetbootin" into the search box and Unetbootin will be the first option. Click on the icon to run Unetbootin.

To create a bootable USB drive you need to insert a blank USB drive into a USB port and then select the disk image option.
Clicking on the button with 3 dots brings up a file browser and you should be able to find the downloaded Ubuntu ISO.
Make sure that the USB Drive is indeed in the drive letter specified and when you are happy that you aren't about to install somewhere you shouldn't click OK.
It takes a few minutes for Unetbootin to do it's stuff but ultimately you will end up with a bootable USB drive.
4. Turn off fast boot and disable secure boot
Turn off fast boot

To turn off fast boot you need to get into the control panel and then the power options.
To open the control panel move your mouse to the top right corner and then click on the settings icon that appears.
When the menu appears click on the control panel.
From within the Control Panel click on the "Power Options" icon.
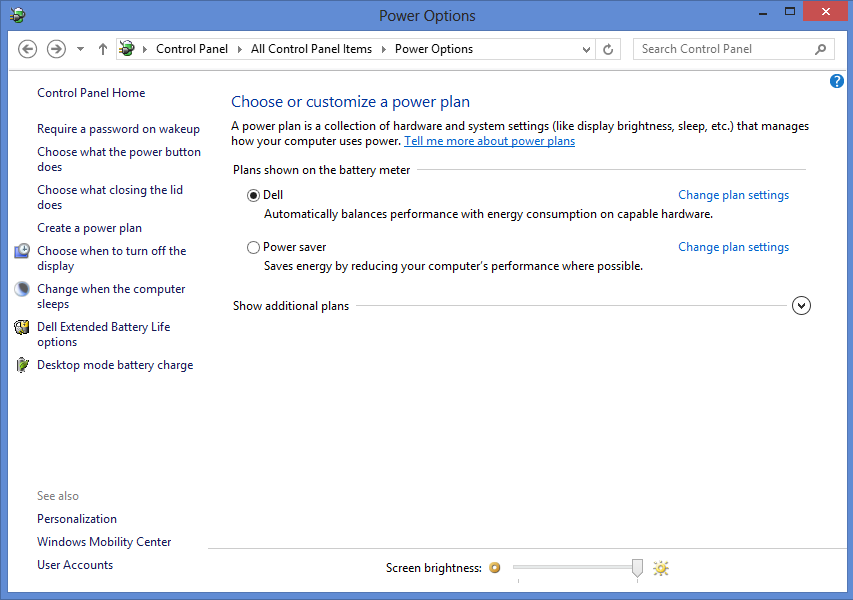
From the "Power Options" screen look down the menu on the left side and select "Choose what the power button does".

On the snappily titled "Define power buttons and turn on password protection" screen scroll down to the bottom.
There should be an option that says "Turn on fast startup". If this option doesn't appear click on the link at the top of the window that says "Change settings that are currently unavailable".
If the "Turn on fast startup" option is checked turn it off. I know that it says recommended but in this case it really isn't recommended.
Click the "Save Changes" button to continue.
Turn off secure boot
To turn off secure boot move your mouse to the top right corner and then click the settings option.
Now comes the ninja bit. Hold down the shift key and select "power" and "restart" whilst keeping the shift key held down. (Take out the USB drive if it is still plugged in).

When you reboot a screen similar to the one above will appear. The option you should choose is the UEFI Firmware Settings.
At this point you will be taken into the UEFI settings for your make of computer and I can't write instructions for each make and model therefore Google is your friend (and not at all evil). Type in your make and model and search for UEFI settings.
When you are in the UEFI settings you are looking for the option that says something like "Secure boot" with the value set to "Enabled" and you want to set that option to "disabled".
5. Run the Ubuntu Installer
To load Ubuntu in live mode insert the USB drive created in step 3 and reboot your computer.

It is a beautiful sight seeing Windows disappear and Ubuntu appear in its place even if it is the live USB version.
Let's get started.
Clicking on the "Install Ubuntu 13.04" (or 12.04 if you are going LTS) brings up the Ubuntu installer.

If you speak English I recommend choosing English (unless you feel you need an extra challenge) and indeed if you aren't a native English speaker then choose the language you feel most comfortable using.

As you can see from the screen image I had plenties of disk space and I was fully plugged in to the power but I didn't have an internet connection.
Having the internet connection set up lets you download updates on the go. I prefer to do it afterwards.
You will also notice the "install this third party software" checkbox which will make Flash and MP3s work straight away after the install.

You can choose any one of your broadband connections.
I have 2 available to me and neither of them are any good.
I prefer to install first and update later so I leave the internet disconnected.
6. Partition the empty space
This bit is going to amend your hard drive partitions and if you didn't do a backup at the beginning this is the point of no return.I highly recommend making sure you have created the correct recovery media before continuing.
I could have made the install process one big step but the partitioning takes a bit of explaining so I put this in a separate section.

- Erase disk and install Ubuntu
- Something else
This guide is about installing alongside Windows 8 and therefore to do this choose "Something Else".

The disk layout on the Dell Inspiron 3521 is quite involved.
What you should do is look for the large amount of unpartitioned space by scrolling down. (For the Dell it was /dev/sda7).

When you find the unpartitioned space click on the plus symbol and create a logical partition. Mount the partition to / and set the size to 50 gigabytes. Set the partition type to EXT4.
Now find the unpartitioned space again and click on the plus symbol and create another logical partition. Mount this one to /HOME and set the type to EXT4. The size should be virtually all the unpartitioned space minus about 16 gigabytes.
There is a lot said about how much swap space you need but as disk space isn't exactly expensive anymore I always just choosing 16 gigabytes which is way more than is actually required. (By quite some distance). You will therefore need to create a third partition in the unpartitioned space and choose SWAP as the type.
When it comes to choosing where to install the bootloader don't change a thing. Leave it pointing to "/dev/sda". Whatever you do don't choose one of the other partitions like "/dev/sda1" or "/dev/sda2" etc. This is one of the most common mistakes people make.
For the 3 partitions that you just created make sure the format checkbox is checked.
Do not continue unless you are really satisfied that you have done everything correctly and that you have a backup available in case of bad times.
Press Install to continue.
7. Complete the installation
The installation will now continue and you will see files copied across and the installation taking place.At this point you will be able to choose keyboard layouts, timezone and you will be asked to add a new user.
At the end of the install process you will asked if you want to restart the system or continue using the live version.
8. Reboot into the live image
At this point it is worth rebooting the computer to see what has happened.When the computer has started to reboot remove the USB drive and let the bootup process begin as normal.
If you are lucky everything has worked perfectly well and you have a GRUB menu showing options for Windows and Ubuntu.
The reality is that you will be very lucky if that really has happened.
One of three things will have happened:
- Ubuntu will have loaded
- Windows will have loaded
- Nothing loads
Unless you have a perfectly running dual boot system plug your USB drive back in and reboot so that the live version of Ubuntu runs again.
9. Run the boot repair
For the next part you will venture into the terminal. Press the super key on your keyboard (that is the one that looks like the Windows icon).
Type "term" into the search box that appears. Click on the "Terminal" icon.
From within the terminal window type the following:
The above command adds a special repository to your Ubuntu live system and then the update command downloads a list of all the applications that reside in that repository.
Now all you have to do is type:
The information I am providing here comes straight from the following page:https://help.ubuntu.com/community/Boot-Repair (Just in case you thought I was making all this up as I went along).A message will appear saying that boot repair is scanning your partitions.

At this point I clicked the "Recommended repair" button as it does say it fixes the most frequent problems.
After a few minutes the application will tell you if it needs you to run extra commands in the terminal and it gives you the commands to copy and paste.
By following the instructions provided my boot loader was fixed and I could move on to the final step.
10. Test that everything works
Reboot your computer and remove the USB drive.You should now have a menu with various options on it. The first one will be Ubuntu and somewhere down the list is Windows EFI.
Try Ubuntu and make sure that it loads correctly, then reboot and try the Windows EFI option. Windows 8 should now load.
Troubleshooting
If either Windows or Ubuntu won't load or nothing loads at all it is worth checking over the above steps to make sure you turned off fast boot and secure boot.
If you think you have done everything correctly then copy any errors and load the Live USB version of Ubuntu again.
Now Google is again your friend (and not at all evil). Search for the error text that you received or go to the Ubuntu forums and search there for your error.
If that fails to help you can either ask for help yourself at the Ubuntu forums or on the Ubuntu sub-reddit.
Another option is to open XChat by pressing the super key and typing XChat. Now find the Ubuntu IRC chatroom and state your issues within the realms of IRC chat. There are always helpful people there.
but ..... if all else still fails .... remember those backups I mentioned throughout this article. It is time to think about using them.
You can always restore Windows to it's original state and try following the instructions again.
Summary
I hope this article helps some of you install Ubuntu alongside Windows.It will probably take you less time to install Ubuntu than it has to read the article down to this far.
Don't be afraid. Give it a go. You will be glad you did. Let's face it. Windows 8 sucks.
Thankyou for reading.


