Sunday, May 18, 2014

The Ultimate Beginner’s Guide to Energy Saving Light Bulbs

Energy Saving Light Bulbs
Five years ago I bought my first LED light bulbs.  They were to replace halogens in my bathroom.  I spent too much money on not enough lumens and way too many kelvin.  You know what I mean?
No?  Perfect. Let’s make a deal?!
If you spend ten minutes reading this post I promise you that by the end of it you’ll understand how to buy a low energy light bulb.  In return I’ll try not to bore you senseless.
Ready?  Let’s do this.  With five simple questions.

1) What fitting do you need?

This is simple, but you really don’t want to mess it up.  
Although there are literally hundreds of light fittings in existence, your home probably only has a couple.  I’ve got two in my ceiling fittings, a couple more in table lamps.  In the image below there are some common ones for the UK and US.
bulb fittings
‘B’ is for Bayonett, it’s a bit of a British Empire thing.  ’E’ is for Edison Screw, dominant in the US thanks to Thomas.  ’GU’ is for, gee you really need to get yourself a life a if you know what ‘GU’ means.
You don’t need to know what they mean.  But if you scribble down the fittings before you start shopping for bulbs not only will they fit, they’ll be the right voltage too.

2) What shape bulb do you want?

Bulb shape is not just a question of liking the look of a bulb, it is about how it throws light.  The design of the bulb determines what direction the light goes, so you need to consider what you want the bulb to do.
bulb shape
There is literally an alphabet describing different bulb shapes, but since I promised not to bore you I’m just not going to go there. All you need to do for shape is use your common sense.
For a ceiling pendent you might want an ‘omnidirectional’ bulb like the arbitary, stick or spiral shape.  For a lamp you might need a candle shape with a broad spread.  And if you are putting a spot into a recessed downlight you’ll need a reflector with an appropriate beam width for the context.
A bulb that throws the wrong angle light can be really annoying, so do take the time to contemplate the shape before you buy.

3) How bright does it need to be?

It is no longer enough to think about bulb brightness in terms of watts.  That was fine when we only had incandescents, but now we need to start thinking in lumens.
This is particularly the case when buying LEDs, because the use of the term ‘replacement’ is can be abused by bulb re-sellers, and occasionally by lesser manufacturers too.  The following tables are a rough explanation of how many lumens you get from your watts for different bulb technologies for a standard fitting.
Now I’m very sorry to do this, but I had to make two charts to explain this properly.  One for our readers in the low voltage (120V) countries like the US, Canada, Brazil and Japan.  And a second one for readers in high voltage (240V) countries, that’s the rest of the world.

The American Lumen:

If you live in the US, or anywhere else with a lower voltage grid, please look at this first chart.  If you live elsewhere skip straight to the second.
Lumens US
At the top of this chart you have the brightness of the bulb in lumens.  This is the number you need to start thinking in.
Let’s say you’re in the US and want to replace an old 60W bulb and get a similar amount of light.  Then you know you’ll need to get at least 800 lumens in order to match the brightness of the old 60W .
Got it?  If you know your lumens, you won’t be mis-sold a ‘replacement bulb’ that isn’t bright enough.

The High Voltage Lumen (UK):

In the rest of the world grids have higher voltage, meaning that lumen equivalent for standard incandescents is different.
Lumens needed
At the top of this chart you have the brightness of the bulb in lumens.  This is the number you need to start thinking in.
Let’s say you’re in the UK and want to replace an old 60W bulb and get a similar amount of light.  Then you know you’ll need to get at least 700 lumens to get a similar brightness to the old bulb.
Knowing your lumens means you will get the brightness you want, and avoid being mis-sold ‘replacement bulbs’.

A quick word on spotlights:

Just spot me a second here.  Both the two charts above are designed to help you replace a normal lightbulb.  When it comes to spotlights you can often experiment with going for fewer lumens.  In our bathrooms I have replaced 700lm halogens with 320lm LEDs and actually prefer the light.  The result is a 90% energy use reduction per bulb.

4) Do you want warm or cold light?

This question might sound complicated, but it is dead easy and one of the great things about LEDs.
The temperature of light can be measured in terms of ‘kelvin’.  Very orange light has a low number of kelvin, for example a candle is about 1,500K.  Daylight is much colder, often above 5,000K.  Here is the scale.
kelvin scale lightbulbs

When it comes to household light bulbs the temperature choices are very simple.  Most people simply want what is called ‘warm white’ (2,700k) to replicate the warm, slightly yellow glow of an old incandescent or halogen.
In a kitchen, bathroom or other situations you may prefer a slightly less yellow light, sometimes called a natural white (3,000K). You may want to try cool white (4,000K).  Or for a very specific style (5,000K).  Anything above that starts to get a little blue.
This type of temperature choice is mostly associated with LEDs.  If your home has a quite modern style you should definitely consider trying some cooler temperatures, as they can look great in the right context.

5) Are LEDs good value yet?

Compact fluorescent (CFLs) bulbs are now so cheap that a CFL can pay itself off with energy savings in just months for a well used bulb.  I personally quite like CFLs in the right context, but if you want instant light, dimming or cooler light they aren’t great.
LEDs on the other hand are gradually overcoming many of these problems.  The main issue with LEDs at this point is their upfront cost.  This is particularly true for 75W and 100W replacements (I’m waiting for prices to drop).
With this in mind let’s crunch some numbers and see how the payback is for LEDs.  In the following chart I estimate how quickly energy savings will recoup the cost of replacing a 60W incandescent with a 10W LED that costs $10, assuming the bulb is used for 2 hours each day.
LED payback times
Because of the huge difference in the prices of electricity the $10 outlay for the LED pays itself off in anything from 9 months in expensive Denmark to three and a half years in India or China, where electricity is cheap.
Of course a 60W LED for $10 is still quite cheap.  If it costs you $20 to get such a bulb you’d need to double these numbers.  On the other hand if you are using the bulb 4 hours a day, then you should halve them.  What does this mean for you in practical terms?
  • Cheaper LEDs payback faster
  • Payback is faster where electricity is expensive
  • The more you use a bulb the faster the payback
  • Replacing CFLs with LEDs is not yet cost effective
In most cases the one year running cost of an incandescent bulb you use regularly (>2 hours a day) is greater than any drop in LED prices we are likely to see.  So it makes sense to switch when you see a decent value bulb.  However, if you don’t use a bulb much (< 1 hour a day) you may want to wait for falling prices.  Especially in the 100W replacement range which are still extortionate.
I have one incandescent left in my loft that I’d be lucky to use for 10 hours a year.  I’ll probably only switch it if it blows.

5 Steps to Buying a Energy Saving Light Bulb

If you’ve made it this far you now know a lot about light bulbs.  Because I promised not to bore you I’ve decided not to discuss dimming (read the labels), color rendering (above 80 please) and bulb lifespan (buy a known brand).
Let’s just recap the five steps:
  1. Fitting: Write down the code
  2. Shape: Decide on the best shape
  3. Brightness: Get enough lumens!
  4. Temperature:  Warm or cool?
  5. Cost: Look for good value bulbs
Like I said in the introduction, I bought my first LED five years ago and only really got the first of these five steps correct.  But things have changed an awful lot in five years, and LEDs are now becoming a really sensible option.  CFLs remain excellent value due to their low prices and running costs, but you can’t always get the light you want.
If you have never bought LEDs before I highly recommend trialing a single bulb, or spotlight, first before buying too many. LEDs are not cheap and last a long time, so you want to be sure about fitting, shape, lumens and kelvins before going all in on them.  I also recommend looking for specials on known brands or having a money back guarantee up your sleeve.
Here in the UK I’m on the lookout for decent 10W LEDs around the £10 mark. This Verbatim LED 10,5 W  verbatim is a great deal for £9.99.  Or something like this 10 Watt LED (or in a screw fit).  I’ve just bought this Philips Master because I’ve always liked the look of it and saw a big price drop .  For bathroom or kitchen spots I prefer LEDHUT.
Looking over the pond to the US I’m almost jealous. You guys get similar 10W LEDs for $10.  This great 11W LED Dimmablefrom Phillips (complete with Energy Star rating) for $15.  Interesting slim style bulbs. Your LED spots  are cheaper too.  And you can buy remote controlled color changing LEDs  for just $13, which is not boring!!
If you made it the end, thanks for reading.  I wish you much success with your LED hunt and hope you get the right fit, shape, brightness and temperature at a decent price.  Most importantly I hope you prefer the light of your new bulb, as that is the main test of success.

Power of Rising Sun

Germany is the world leader in terms of the total megawatts of electricity produced by using solar technology. A couple of years ago the German government provided an incentive to the citizens to produce electricity from renewable sources in their homes and sell excess units to it or get them adjusted against the bills they received for using conventional electricity.

Called “feed-in tariff”, this concept was introduced to promote the use of cleaner technologies to meet energy needs of the country and also cut on the cost of production and maintenance in the long run. Within two years, 14,000 megawatts of electricity was added to the system. People would switch on the solar systems they had installed before leaving for work or going to schools or colleges. By the time they returned sufficient energy would had been produced and diverted to the grid.

It is interesting to note that this capacity added over a brief period of two years is almost equal to the total energy demand of Ghana. This leads to the question as to why a country like Ghana which is facing a severe energy crisis cannot try a similar option and come out of the dilemma it faces. Are the policy makers sitting on top not wise enough to gauge the potential or is it the powerful lobbies and mafias used to receiving kick-backs who become a hurdle in the launch of such initiatives in Ghana?

Friday, February 7, 2014

Install Ubuntu Linux Alongside Windows 8

2. Shrink the Windows partition

Windows is like an infestation of cockroaches. Cockroaches will keep filling up space until it runs out and will try and find some more space. Windows is built to believe that all the available disk space belongs to it and therefore there is no spare space for another operating system.

To get around this issue there is a tool available within Windows that lets you shrink the Windows partition (or indeed any other partition on the disk).


To be able to shrink the Windows partition you will need to run the "Disk Management" tool. To do this move your mouse to the top right corner and click on the search icon. Now click the settings icon and start typing "disk".

Click on the option "Create and format hard disk partitions".

As you can see the Dell Inspiron by default has a busy looking disk layout.

The operating system is on drive C and is called OS. 

This is the partition that needs to be shrunk in order to make space for Ubuntu.


Right clicking on the relevant drive brings up a context menu and on that context menu is the option to "Shrink Volume".

When you click on "Shrink Volume" a box appears asking you how much disk space you want to shrink the disk by.


The Shrink utility helpfully sets up the amount of disk space that it can comfortably spare.

Unless you have a reason to choose otherwise it is generally fine enough to accept the default options.

Click on "Shrink" to start the process.

Unlike the backup process this bit is quite quick.


3. Create a bootable USB drive with Ubuntu on it

Download Ubuntu

You can download Ubuntu from http://www.ubuntu.com/download/desktop.

As you can see there are two versions available.

Version 12.04 is a long term support release which means you can install it now and it will still receive updates in 4 years time. This is great if you are the sort of person who likes stability and you aren't too bothered about getting the new features early.

Version 13.04 has only 9 months worth of support and then you will be expected to upgrade to a newer version of Ubuntu. This may sound like a very short period of time (and it is) but 13.04 already feels slick compared to 12.04.

If you become comfortable with the installation process then moving up to the latest versions keeps you in the now club.

The long term support releases are great but consider that the last LTS version was back at version 10 which pre-dates Unity. To quote Ferris Bueller:
Life moves pretty fast. If you don't stop and look around once in a while, you could miss it.
The one thing you do have to do though to be able to run Ubuntu alongside Windows 8 is to choose the 64-bit version.

Note that if you have a Dell Inspiron 3521 and you wish to install version 12.04 there is a dedicated version especially for you at http://www.ubuntu.com/certification/hardware/201208-11539/.

The Dell Inspiron 3521 can be purchased pre-installed with Ubuntu and therefore there is already an image available which has all the necessary drivers set up.

I can confirm however that I installed Ubuntu 13.04 and I used the stock 64-bit download and I have had no issues with Ubuntu whatsoever.

If you live in the city then downloading Ubuntu will be a quick process. If you live in the countryside and your internet connection sucks as much as mine then there is always the option of buying a DVD pre-installed within Ubuntu Linux.

Download Unetbootin

Unetbootin is the tool that I used to create a bootable USB drive with Ubuntu on it. To download Unetbootin visit http://unetbootin.sourceforge.net/.


Click on the "Download (for Windows" link. The download is fairly small and even on my meagre internet connection takes under a minute.


To run Unetbootin press the "Start" button and click on "Files". Now type "Unetbootin" into the search box and Unetbootin will be the first option. Click on the icon to run Unetbootin.


To create a bootable USB drive you need to insert a blank USB drive into a USB port and then select the disk image option.

Clicking on the button with 3 dots brings up a file browser and you should be able to find the downloaded Ubuntu ISO.

Make sure that the USB Drive is indeed in the drive letter specified and when you are happy that you aren't about to install somewhere you shouldn't click OK.

It takes a few minutes for Unetbootin to do it's stuff but ultimately you will end up with a bootable USB drive.

4. Turn off fast boot and disable secure boot

Turn off fast boot

To turn off fast boot you need to get into the control panel and then the power options.

To open the control panel move your mouse to the top right corner and then click on the settings icon that appears.

When the menu appears click on the control panel.

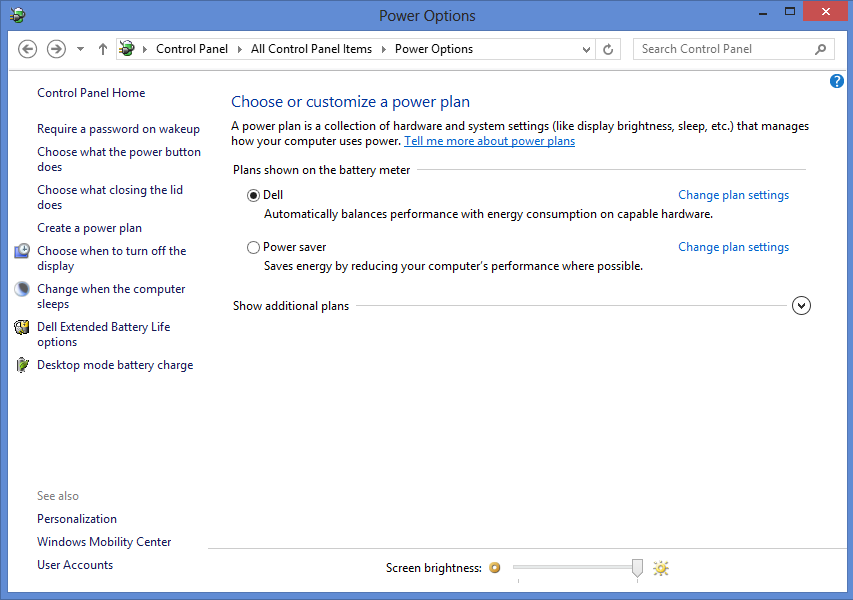
From within the Control Panel click on the "Power Options" icon.

From the "Power Options" screen look down the menu on the left side and select "Choose what the power button does".


On the snappily titled "Define power buttons and turn on password protection" screen scroll down to the bottom.

There should be an option that says "Turn on fast startup". If this option doesn't appear click on the link at the top of the window that says "Change settings that are currently unavailable".

If the "Turn on fast startup" option is checked turn it off. I know that it says recommended but in this case it really isn't recommended.

Click the "Save Changes" button to continue.

Turn off secure boot

To turn off secure boot move your mouse to the top right corner and then click the settings option.

Now comes the ninja bit. Hold down the shift key and select "power" and "restart" whilst keeping the shift key held down. (Take out the USB drive if it is still plugged in).


When you reboot a screen similar to the one above will appear. The option you should choose is the UEFI Firmware Settings.

At this point you will be taken into the UEFI settings for your make of computer and I can't write instructions for each make and model therefore Google is your friend (and not at all evil). Type in your make and model and search for UEFI settings.

When you are in the UEFI settings you are looking for the option that says something like "Secure boot" with the value set to "Enabled" and you want to set that option to "disabled".

5. Run the Ubuntu Installer

To load Ubuntu in live mode insert the USB drive created in step 3 and reboot your computer.


It is a beautiful sight seeing Windows disappear and Ubuntu appear in its place even if it is the live USB version.

Let's get started.

Clicking on the "Install Ubuntu 13.04" (or 12.04 if you are going LTS) brings up the Ubuntu installer.

The first step lets you choose the language for the installer.

If you speak English I recommend choosing English (unless you feel you need an extra challenge) and indeed if you aren't a native English speaker then choose the language you feel most comfortable using.


The preparation screen shows you whether you are fully prepared for installing Ubuntu.

As you can see from the screen image I had plenties of disk space and I was fully plugged in to the power but I didn't have an internet connection.

Having the internet connection set up lets you download updates on the go. I prefer to do it afterwards.

You will also notice the "install this third party software" checkbox which will make Flash and MP3s work straight away after the install.

If you aren't already connected to the internet now is your chance to get connected.

You can choose any one of your broadband connections.

I have 2 available to me and neither of them are any good.

I prefer to install first and update later so I leave the internet disconnected.


6. Partition the empty space

This bit is going to amend your hard drive partitions and if you didn't do a backup at the beginning this is the point of no return.

I highly recommend making sure you have created the correct recovery media before continuing. 

I could have made the install process one big step but the partitioning takes a bit of explaining so I put this in a separate section.

There are 2 options available to you from the partitioning screen.
  • Erase disk and install Ubuntu
  • Something else
If you just want to install Ubuntu and forget Windows ever existed (and if you have tried Windows 8 nobody is going to blame you for making this decision) you can simply press continue .

This guide is about installing alongside Windows 8 and therefore to do this choose "Something Else".


The disk layout on the Dell Inspiron 3521 is quite involved.

What you should do is look for the large amount of unpartitioned space by scrolling down. (For the Dell it was /dev/sda7).


When you find the unpartitioned space click on the plus symbol and create a logical partition. Mount the partition to / and set the size to 50 gigabytes. Set the partition type to EXT4.

Now find the unpartitioned space again and click on the plus symbol and create another logical partition. Mount this one to /HOME and set the type to EXT4. The size should be virtually all the unpartitioned space minus about 16 gigabytes.

There is a lot said about how much swap space you need but as disk space isn't exactly expensive anymore I always just choosing 16 gigabytes which is way more than is actually required. (By quite some distance). You will therefore need to create a third partition in the unpartitioned space and choose SWAP as the type.

When it comes to choosing where to install the bootloader don't change a thing. Leave it pointing to "/dev/sda". Whatever you do don't choose one of the other partitions like "/dev/sda1" or "/dev/sda2" etc. This is one of the most common mistakes people make.

For the 3 partitions that you just created make sure the format checkbox is checked.

Do not continue unless you are really satisfied that you have done everything correctly and that you have a backup available in case of bad times.

Press Install to continue.

7. Complete the installation

The installation will now continue and you will see files copied across and the installation taking place.

At this point you will be able to choose keyboard layouts, timezone and you will be asked to add a new user.

At the end of the install process you will asked if you want to restart the system or continue using the live version.

8. Reboot into the live image

At this point it is worth rebooting the computer to see what has happened.

When the computer has started to reboot remove the USB drive and let the bootup process begin as normal.

If you are lucky everything has worked perfectly well and you have a GRUB menu showing options for Windows and Ubuntu.

The reality is that you will be very lucky if that really has happened.

One of three things will have happened:
  1. Ubuntu will have loaded
  2. Windows will have loaded
  3. Nothing loads
If either Ubuntu or Windows loads then you just have a bootloader issue, if nothing loads it is likely that you didn't turn off secure boot and probably have messages on the screen saying so.

Unless you have a perfectly running dual boot system plug your USB drive back in and reboot so that the live version of Ubuntu runs again.

9. Run the boot repair

For the next part you will venture into the terminal. Press the super key on your keyboard (that is the one that looks like the Windows icon).


Type "term" into the search box that appears. Click on the "Terminal" icon.

From within the terminal window type the following:
sudo add-apt-repository ppa:yannubuntu/boot-repair && sudo apt-get update
The above command adds a special repository to your Ubuntu live system and then the update command downloads a list of all the applications that reside in that repository.

Now all you have to do is type:
sudo apt-get install -y boot-repair && (boot-repair &)
The information I am providing here comes straight from the following page:https://help.ubuntu.com/community/Boot-Repair (Just in case you thought I was making all this up as I went along).

A message will appear saying that boot repair is scanning your partitions.


At this point I clicked the "Recommended repair" button as it does say it fixes the most frequent problems.

After a few minutes the application will tell you if it needs you to run extra commands in the terminal and it gives you the commands to copy and paste.

By following the instructions provided my boot loader was fixed and I could move on to the final step.

10. Test that everything works

Reboot your computer and remove the USB drive.

You should now have a menu with various options on it. The first one will be Ubuntu and somewhere down the list is Windows EFI.

Try Ubuntu and make sure that it loads correctly, then reboot and try the Windows EFI option. Windows 8 should now load.

Troubleshooting

If either Windows or Ubuntu won't load or nothing loads at all it is worth checking over the above steps to make sure you turned off fast boot and secure boot.
If you think you have done everything correctly then copy any errors and load the Live USB version of Ubuntu again.
Now Google is again your friend (and not at all evil). Search for the error text that you received or go to the Ubuntu forums and search there for your error.
If that fails to help you can either ask for help yourself at the Ubuntu forums or on the Ubuntu sub-reddit.
Another option is to open XChat by pressing the super key and typing XChat. Now find the Ubuntu IRC chatroom and state your issues within the realms of IRC chat. There are always helpful people there.
but ..... if all else still fails .... remember those backups I mentioned throughout this article. It is time to think about using them.

You can always restore Windows to it's original state and try following the instructions again.

Summary

I hope this article helps some of you install Ubuntu alongside Windows.

It will probably take you less time to install Ubuntu than it has to read the article down to this far.

Don't be afraid. Give it a go. You will be glad you did. Let's face it. Windows 8 sucks.

Thankyou for reading.

Thursday, February 6, 2014

Things To Do After Installing Ubuntu 13.10

Ubuntu 13.10, codenamed Saucy Salamander has been released as per its schedule on 17th October. If you did not upgrade from Ubuntu 13.04 to Ubuntu 13.10 and instead you did a clean install of Ubuntu 13.10, you might be wondering what are the things to do after installing Ubuntu 13.10.
This is one of the first question that pops up after installing any new OS, what to do next? I have previously written on things to do after installing Elementary OS Luna and Ubuntu 13.04, and now I am here with the list of must to do things after installing Ubuntu 13.10. While different people have different requirement and thus their to do list may differ from the one here, most of the things are still essential after a clean install.

Must to do things after installing Ubuntu 13.10

Update Ubuntu 13.10:

First and foremost thing after installing Ubuntu 13.10 is to update the system. Open a terminal (Ctrl+Alt+T) and use the following command:
sudo apt-get update && sudo apt-get upgrade

Install Ubuntu restricted extras:

“Ubuntu restricted extras” consists of several codecs that are not installed by default. The reason Ubuntu doesn’t include these codecs by default is because of legal constraints in many countries. But if you install these codecs, it is you who would be held responsible for the usage and not Ubuntu. Don’t worry its safe to install these codecs. With these codecs installed, you can play different media formats such as MP3, MP4, AVI and several other formats. Install it using the following command:
sudo apt-get install ubuntu-restricted-extras

Install Adobe Flash player:

Even after installing extra codecs, you may face difficulties with Adobe Flash player. You may not be able to run YouTube videos is one of the example. You can install Adobe Flash player using the following command:
sudo apt-get install flashplugin-installer

Install VLC media player:

The default video player Totem is quite good but VLC is the best open source media player for playing videos. Apart from playing almost all kind of media files, VLC can download subtitles automatically and you can also play YouTube videos with subtitles. Install VLC player in Ubuntu 13.10 using the following command:
sudo apt-get install vlc

Play encrypted DVD in Ubuntu 13.10:

Enable encrypted DVD playback in Ubuntu 13.10 using the following commands:
sudo apt-get install libdvdread4
sudo /usr/share/doc/libdvdread4/install-css.sh

Install RAR:

To avoid error like “There is no command installed for RAR archive files“ install RAR in the following manner:
sudo apt-get install rar

Get rid of “Sorry, Ubuntu 13.10 has experienced internal error”

Ubuntu 1310 has experienced internal error
Its a legacy now. It started with Ubuntu 12.04 and continue till date. Though totally harmless, this crash report is extremly annoying. You can disable the apport by editing the following file:
gksu gedit /etc/default/apport
Now, in this file look for the line # sudo service apport start force_start=1 enabled=1
Change the enabled=1 to enabled=0. For more detail steps, follow this article on how to get rid of Sorry, Ubuntu has experienced an internal error.

Install additional drivers in Ubuntu 13.10:

You may suffer from Wireless and graphics card related problem. To avoid such troubles, install the third part propriety drivers. Go to Unity Dash and search for Software & Updates. Open Software & Updates and click on Additional Drivers tab. If there are any additional propriety drivers for your system, it should be listed here.
Install additional drivers Ubuntu 13.10

Improve battery life and reduce overheating:

One of the important things to do is to take care of your laptop’s battery life and overheating issue. Until Ubuntu 12.10, Jupiter was the best tool to reduce overheating, but since its development has stopped, you can use TLP or CPUFREQ instead of Jupiter. Install TLP using the following command:
sudo add-apt-repository ppa:linrunner/tlp
sudo apt-get update
sudo apt-get install tlp tlp-rdw
sudo tlp start
And that’s it. No configuration required for using TLP. Install it and forget about it. Read this article on how to use CPUFREQ to reduce overheating in Ubuntu. Oh! By the way Jupiter is still available unofficially. But it is better to use TLP as Jupiter is no longer being developed. Your choice basically.

Install other desktop environments:

Unity is not everyone’s favourite, is it? You don’t need to ditch Ubuntu just because you hate Unity. Just replace Unity with your favourite Gnome or Cinnamon.
Install Gnome 3 in Ubuntu 13.10 using the following command:
sudo apt-get install gnome-shell ubuntu-gnome-desktop
Install latest stable Cinnamon in Ubuntu 13.10 using the following command:
sudo add-apt-repository ppa:gwendal-lebihan-dev/cinnamon-stable 
sudo apt-get update 
sudo apt-get install cinnamon

Tweak Unity and Gnome:

Not satisfied with the default looks of Ubuntu 13.10? You can always tweak it. Though you can do that using the options provided in Ubuntu itself, Unity Tweak Tool and Gnome Tweak Tool are excellent tools to tweak the appearance to any extent. Use the following commands:
sudo apt-get install unity-tweak-tool
sudo apt-get install gnome-tweak-tool

Install Java in Ubuntu 13.10:

Sooner or later, you’ll have to install Java. There is simply no escaping from it, no matter how much you try. Assuming that you are not going to do Java development, you’ll only need OpenJRE. Install Java in Ubuntu 13.10 using the following command:
sudo apt-get install icedtea-7-plugin openjdk-7-jre

Install Dropbox:

Ubuntu 13.10 now gives you the option of configuring Ubuntu One at installation time itself. But that does not stop me from using Dropbox, my favourite Cloud storage. You can install Dropbox from their website or by using this command:
sudo apt-get install dropbox

Privacy matters:

You can configure different types of security and privacy options by going in Security & Privacy in System Settings. You will find an option of turning off the online search suggestions in it. But since it will turn off all kind of online suggestion, you might not want to deteriorate your experience of Unity smart scopes. So, here is an option for you. Disable just the shopping suggestions and keep the rest (like Wikipedia suggestions) in the Dash. Use the following command to disable the shopping suggestions from Unity Dash (my theme cannot display the command properly, sorry for that):
gsettings set com.canonical.Unity.Lenses disabled-scopes "['more_suggestions-amazon.scope', 'more_suggestions-u1ms.scope', 'more_suggestions-populartracks.scope', 'music-musicstore.scope', 'more_suggestions-ebay.scope', 'more_suggestions-ubuntushop.scope', 'more_suggestions-skimlinks.scope']"
Of course this is not the end of it. There are several other things to do after installing Ubuntu 13.10 but I had to stop somewhere. I hope you find it useful. You can also check another useful post on how to speed up Ubuntu 13.10. What is your to-do list after installing Ubuntu? Did I miss anything here? Do share your views.