Sunday, November 12, 2017

Here is how electric bikes work

Here is how electric bikes work
When you first hear about electric bicycles, you might picture an electric motorcycle or a scooter. However, they look quite different – much like a regular bicycle with several added electrical components such as a motor, battery and controller. These are all seamlessly integrated into the design of the bike and they make up the fundamentals of all of these vehicles available on the market.
Electric bikes handle and pedal just like a regular bicycle. Overall, they also use the same parts. The electric component is meant to enhance human power, but not totally replace it. It makes obstacles such as headwind and hills easier to handle and lets you travel further distances without getting so tired.
To operate one, the battery needs to be charged then you can turn on the controller system, then twist a throttle, pedal the bike forward, or pull the trigger to start the motor drive system. The throttle-only drive acts a lot like a traditional gas-powered scooter since the rider does not have to pedal. On the other hand, pedal-assist mode uses the input of the rider as the throttle signal.
Electric bikes rely on three main components working together to operate: The electric motor, drivetrain and battery.

The motor

The electric motor is the most important feature. The three different kinds of motors which can be found on a majority of electric bikes, are the front hub, rear hub, and mid-drive motor.
Front hub motors are fond on the front tire and give the rider propulsion from spinning the tire. The motor gives the rider the sensation of feeling the bike is pulling forward. Rear hub motors on the other hand, give propulsion by spinning the back tire. They push you forward, which may feel more natural for conventional bike riders than the front hub motors. Power is sent to the drivetrain of the bike rather than a hub in mid-drive motors. The central location of this motor gives a riding sensation that is more natural than either hub motor.

The battery

Batteries today provide riders between 20 and 60 miles per charge. Their range depends on the style of riding – pedal assist, pedal only, or electric only.
In pedal assist bikes, the motor is activated only when the pedals are in motion. Doing so lets the rider still get a workout, but gives you an additional boost to make the ride easier. Pedal only bikes ride just like a normal bicycle, powered by you. In electric only, you simply need to twist the throttle and the bicycle turns on much like a moped. With no assistance from you, this vehicle has the biggest drain on the battery.

Drivetrain

The drivetrain gives you the torque and power needed to turn the wheels of the bicycle manually. Mid-drive motors send power right to the drivetrain, which makes chain cranking easier. A majority of drivetrains also let you shift gears, which vary the difficulty of pedaling.

The jolt

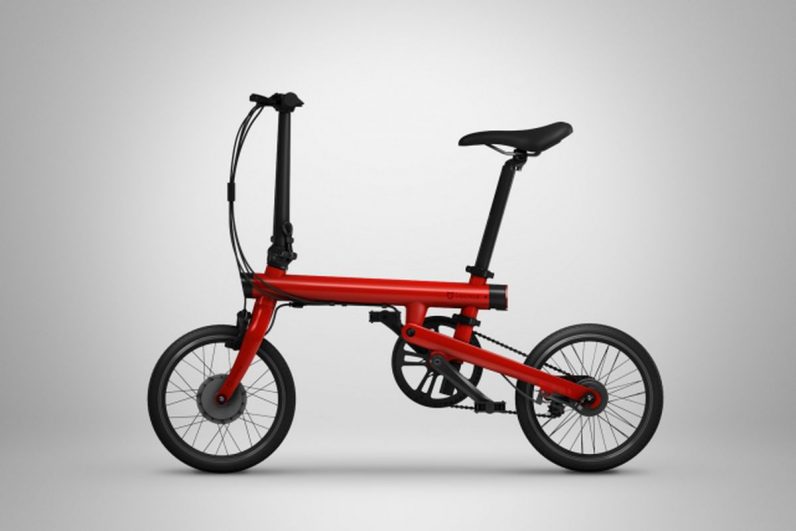
If you are in the market for an electric bicycle, one that is up and coming is the Jolt. A newly designed bike, the Jolt is said to be the most affordable vehicle of its kind. Plus, it folds up for convenient and easy storage, and it ships to you completely assembled.
The Jolt comes equipped with a 36V and 350-watt motor, plus has a fifty-mile range with an LG high-quality lithium-ion battery. Therefore, you get fifty miles of range with pedaling alone, or thirty miles without any pedaling at all. The speed of this bike is capped at 20 mph. It has the power to propel the bike at higher speeds, but regulating it at 20 mph keeps it street legal and reduces the wear on the engine.

Additional features

Almost every electrical bike is equipped with a small LED or LCD display, which monitors some vital riding figures and stats such as battery level, current speed, trip mileage, total mileage, and electric assistance level. Some models, which are advanced, have a display that features advanced stats like cadence monitor, light indicators, current temperature, calorie meter, or navigation.
Lastly, if you are going to ride at night or in inclement weather, lights are an essential you need to have. A lot of bikes come with built-in lights, and if that is the case they are powered usually from the main battery. You may, however, need to purchase lights separately.
courtesy: TheNExtWeb.com

Friday, November 25, 2016

How to delete the Windows.old folder from Windows 10

Did you upgrade your PC to Windows 10? If so, ever wonder what happened to the previous version of the OS? It probably disappeared into the mists of Windows past, right?
Wrong. Your old OS didn't get erased; rather, it's lingering in a system folder called, aptly enough, Windows.old. And depending on the size of that version, it could be hogging a lot of precious space.
First things first: If you think you might want to downgrade from Windows 10 back to the previous version, don't delete that folder.
windows-old-folder.jpg
Photo by Screenshot by Rick Broida/CNET
Second, unless you're seriously strapped for space on your hard drive, you don't have to do anything: Windows 10 will automatically delete the Windows.old folder one month after you performed your upgrade.
If you'd rather not wait -- if you want to reclaim that storage now -- you can delete the folder immediately, though not in the way you might expect. Indeed, if you simply click the folder and then press the Delete key, Windows will tell you you need permission, yada-yada, etc.
Here's the proper way to delete the Windows.old folder:
Step 1: Click in Windows' search field, type Cleanup, then click Disk Cleanup.
Step 2: Click the "Clean up system files" button.
Step 3: Wait a bit while Windows scans for files, then scroll down the list until you see "Previous Windows installation(s)."
Photo by Screenshot by Rick Broida/CNET
Step 4: Check the box next to the entry, then make sure there are no other boxes checked (unless you do indeed want to delete those items). Click OK to start the cleanup.
As you can see from my screenshots, Windows 8 was occupying nearly 25GB of space -- a full 10 percent of my solid-state drive. Needless to say, I was glad to be rid of it and get that space back.

Tuesday, July 19, 2016

Find the Large Attachments Eating Up Your Gmail Space with a Simple Search

This may come as a surprise, but Google is known for its search capabilities and offers many useful search shortcuts. It's no wonder that Gmail does the same. Network administrator Josh Gilmour points out on his blog that if you're low on space in your Gmail account, one easy way to fix it is to search by message size.
Searching by size is very simple. You just type size: and then the minimum number of you want each message to be. For example, you'd type size:1000000 for messages greater than 1MB. Here are a few more examples, and you can click each link to see the results in your inbox immediately:
Pretty useful for clearing things out.

Wednesday, December 2, 2015

How to Keep Printer Ink From Drying Out

If you have printers in your office that you seldom use, you run the risk of the printer ink drying out. When you attempt to use these old cartridges to print your business documents, the output will be unclear and barely readable. Fortunately, you can take several steps to keep your printer ink from becoming unusable.

Keep Cartridges Active

One simple way to prevent printer ink from drying out is to use the ink cartridges. Make a point of printing at least several pages a week, even if you simply print a test page and then discard it. Additionally, make sure the documents that you print utilize all of the colors in your ink cartridges. This will ensure that seldom-used colors won’t dry out and render the cartridges unusable, creating headaches when you are in a rush to print important documents.

Moisten Cartridges

Regular moistening can extend the life of your printer cartridges, particularly if they don't get a lot of use. Put on protective gloves and remove the cartridges from the printer. Gently wipe the top of each cartridge with a clean, damp cloth or paper towel to remove residual ink from the surface. This helps to prevent the cartridges from becoming clogged, ensuring a continuous flow of ink during print jobs. Dry the moistened cartridges before reinserting them into your printer.

Adjust Temperature

Maintaining a moderate temperature in your office can go a long way to prevent printer cartridges from drying out. Ink dries out faster when exposed to excessive heat or cold, so try to maintain a comfortable 68 degrees in your office. Besides extending the life of your cartridges, this measure will create a more comfortable work environment for your employees.

Properly Storage

If you don't intend to use a printer for an extended time, you can preserve the ink cartridges by removing them from the printer and storing them separately. Put on gloves, remove the cartridges and securely wrap in a damp cloth or paper towel. Place the cartridges in a sandwich bag or airtight plastic container and store in an area that is not subject to extreme temperatures.
On printers where the print head is integral with the cartridge (most HP models for example), if you know you are not going to be using it for a while simply remove the cartridges, refit the protective covers and pop them into an airtight zip-lock bag until you need to use it.

Sunday, November 22, 2015

How To Reformat An SD Card To Use It Normally Again

WINDOWS
Start a command prompt, and start the DISKPART console. List all of your disks by typing LIST DISK, then select the proper disk with SELECT DISK # (where # is the SD card). You can then type CLEAN to clear the partition table on the card, effectively blanking it. MAKE SURE YOU SELECTED THE PROPER DISK BEFORE RUNNING THE CLEAN COMMAND!
To create a primary partition to reuse the space on the card, type CREATE PARTITION PRIMARY. This will then reallocate the previously "cleaned" space.
To format, type FORMAT FS=FAT32 QUICK, and finally, to reassign a drive letter, type ASSIGN.
If you're unable to determine the proper disk, remove the SD card, run DISKPART and LIST DISK, and then re-run it with the SD card inserted. The SD card is just the disk that has been added.
Note that the above commands are not case sensitive; I used caps to match the convention DISKPART displays
LINUX / MAC
In a terminal, start fdisk /dev/sdx where /dev/sdx is your SD card device (may depend on the Linux distro you're using, see below). You can then delete all existing partitions on the device by typing d, and then adding a single new partition & format it. You an also just type n to create a new partition table, and start laying everything out.
cfdisk is also another viable tool, which is basically fdisk with a greatly improved user interface. In both cases, once the drive is formatted, you will lastly need to mount it.
If you're unable to determine the proper device, remove the SD card, run fdisk -l, and then re-run it with the SD card inserted. The SD card is just the device that has been added.

Thursday, October 8, 2015

Install Google Play Music Manager Beta on Ubuntu 14.04

Google Play Music Manager is a simple open source application used for adding the music files on your computer to your Google Play Music library, from which you can then listen to your songs on your mobile device or computer. With Google Play Music Manager, you can upload at least up to 20,000 songs, choose how much bandwidth you use to upload music, and download music you have uploaded or purchased on Google Play. You can also upload your iTunes, Windows Media, or any other collections of music you have to Google Play Music Manager.
googlemusicmgr-05
Install Google Play Music Manager Beta on Ubuntu 14.04 & Ubuntu 14.10
sudo sh -c 'echo "deb http://dl.google.com/linux/musicmanager/deb/ stable main" >> /etc/apt/sources.list.d/google-musicmanager.list'

wget -q -O - https://dl-ssl.google.com/linux/linux_signing_key.pub | sudo apt-key add -

sudo apt-get update

sudo apt-get install google-musicmanager-beta
– Start Google Play Music Manager
google-musicmanager

Remove Google Play Music Manager Beta
sudo apt-get remove google-musicmanager-beta

Wednesday, September 16, 2015

The Beginners Guide to Understanding Electricity Consumption

Electricity. We all need it. We all pay for it. Most of us would like to keep our electricity consumption (and our bills) to a minimum. But most of us also have no idea where to begin when it comes to calculating our own personal electricity expenses, or understanding how electricity consumption varies from appliance to appliance. To help you better understand your electricity consumption habits and expenses, we’ve put together a very basic guide to help you understand how your electricity bill is calculated.

Woman holding lightbulb
How is a unit of electricity measured?
The power of electricity is measured in watts (W). While watts are used to measure the power of an electrical appliance or product, the amount of energy converted in a one hour (h) period is known as kilowatt-hours (kWh). Therefore the units of electricity we purchase in store for our paid meters or on our electrical bill are equal to the kilowatts of electricity consumed per hour. So, one unit of the electricity that we purchase is equal to 1000 watt-hours (Wh) or one kilowatt hour (kWh).
By the numbers:
  • 1 unit of electricity bought = 1 kilowatt hour = 1000 watt-hours.
  • The wattage of something tells you how much electricity it consumes.
  • The higher the wattage of an item or appliance, the more electricity it uses in a standard period of time.

Watt watt

How much electricity will an item or appliance use?
An appliance will use its wattage worth of electricity in an hour (if left on, uninterrupted for an hour). For example, a 60 watt light bulb will use 60 watt hours of electricity in one hour. It will use 120 watt hours of electricity if left on for 2 hours, and more electricity as the time passes and it is left on to operate. The higher the wattage, the more electricity is required to run the item per hour.


How is the price of electricity determined?
In South Africa, the government has established an independent collective of experts who help to determine the prices we are charged by utilities such as electricity. This collective acts as a regulator and is known as the National Energy Regulator of South Africa (NERSA). It helps to determine the price of electricity by considering the cost to the supplier (as it should be if they run the company efficiently) and what a reasonable profit (rate of return) would be on the regulatory asset base.

The electricity costing program established by NERSA runs according to a semi-set Multi-Year Pricing Determination (MYPD). Currently NERSA operates on a five-year (macro-style) Multi-Year Pricing Determination plan (due to end in March 2018). This is so that the increase in the cost of electricity per year is slightly more predictable. The current price for 1 unit (1 kilowatt-hour) of electricity varies based on numerous factors, but hovers at around roughly R1.50 in domestic environments.

How much electricity does your home use?
To simplify things and help you make educated decisions about how you choose to use your electricity, we’ve compiled a guide to estimating how much electricity your home uses on average. See the appliances below found in a common household, along with their power ratings in Watts, and follow the instructions to calculating energy consumption: 
Appliance power rating (in Watts) X hours in use i.e. 40W x 2hrs = 80Wh or 0.08kWh.
The Beginners Guide to Understanding Electricity Consumption
Courtesy of Sustainable.co.za

Thursday, August 27, 2015

How to Fully Control Your Android Device from Any Computer