With cheap storage readily available, the temptation to build vast libraries of music, movies, photos, and documents is ever present. But when each PC in your home is packed to its aluminum gills with gigabytes upon gigabytes of digital goods, managing all of that data can be a hassle.
Network-attached storage can make wrangling data much easier. Imagine a single machine on your network slinging files to every PC in your home, managing backups, and safeguarding all of your important memories or sensitive data.
Plenty of network-attached storage appliances on the market are ready and able to tackle your storage needs, but buying one can be an expensive option--particularly if you have only a few files that you want to share with a few machines. Things get even more problematic for those users who have terabytes upon terabytes of data: You can expect to pay dearly for a NAS that’s equipped to handle your digital hoard.
Fortunately, building your own NAS is simple. And doing so offers a lot of advantages over forking over your hard-earned cash--build your own, and you can dictate its size, feature set, and storage capacity, and change things on a whim.
Choosing the Software
A wide variety of operating-system options are available for setting up your own NAS. Many popular Linux distributions offer a server-oriented variant, with instructions on getting your file server up and running. But we’re going to keep things simple and go with FreeNAS.
FreeNAS is a popular choice, as it’s fairly easy to configure once all of the hardware is in place. You can download the latest version from the FreeNAS website. Burn the .iso file you download onto a CD or DVD; in Windows 7, just right-click the file and select Burn disc image. For other versions of Windows, you can use the free ImgBurn utility.
Choosing the Hardware
Now that you have a copy of FreeNAS, let’s talk hardware. FreeNAS will run on just about anything, so an old PC you’re not using anymore will work just fine. For optimal performance, you’ll want to have at least 4GB of RAM.
For my FreeNAS build, I pulled a few spare parts together. My NAS centers on a Gigabyte E350N motherboard, equipped with an AMD E-350 processor. I picked this motherboard because it's small, it draws little power, and it can fit into small spaces, yet it offers four SATA ports for my hard drives. When choosing a system (or building your own), make sure that the motherboard has room to support all of the drives you want to use for storage.
I collected three spare 1TB drives for storage, plus a spare DVD drive to handle the installation. When FreeNAS is installed, it takes over the entire drive you install it on. To keep all of the storage drives available, I also grabbed a 2GB USB key, to host the the operating system.
The Setup: Installing FreeNAS
With the hardware selected and the FreeNAS CD at the ready, it’s time to get started.
Insert the DVD and USB key into the computer you’re setting up as your NAS. Before you start the machine up, be sure that the ethernet cable is plugged into the motherboard. You’ll also want to have another computer that’s connected to your network up and running, as you’ll be using it to connect to and configure the NAS.
Start up the PC and enter the BIOS. The steps to getting into the BIOS will vary depending on your motherboard, but the general rule of thumb is to mash the F2, F7, F8, or Delete key while the PC is booting up--watch the monitor after you’ve pressed the power button, and the instructions will scroll past during the normal startup sequence.
Once you’re in the BIOS, set the machine to boot from the optical drive. The steps will once again vary based on your motherboard model, but you should see a section that lists a Boot Priority order. Once you've set that, press F10 to save and exit; the machine will restart, query your optical drive, and then start loading FreeNAS from your CD.
You’ll know that FreeNAS is running when you see a plain blue screen with a list of options. You want to install FreeNAS onto your USB key, so select the very first option. FreeNAS will list arcane drive model numbers, so looking for the capacity of the USB key (in this case, 2GB) should be the easiest approach. Follow the prompts; FreeNAS will warn you that it will delete everything off of the USB key. Click through that message, and then go get a cup of tea while the progress indicator rolls over to 100 percent complete.
Once it’s done, you’ll see a prompt to eject the CD and reboot the machine. When your computer restarts, it should boot FreeNAS from the USB key--if it doesn’t, head back into the BIOS, set the motherboard to boot to the USB key, and restart again.
As FreeNAS is starting up, it will present lots of arcane lines of code, followed by a numbered list and a Web address to connect to. This is normal. That URL is the network address of your new file server. Type that address into a browser on a computer in your home that’s connected to the same network as the NAS, and you’ll reach the FreeNAS configuration screen.
FreeNAS will prompt you for a username and password. The default user name is “admin,” and the default password is “freenas.” You can change the default to whatever you’d like in the FreeNAS options.
If you ever forget your password, resetting it is fairly easy. You need to head over to the NAS, and type the following command:
Python /usr/local/www/freenasUI/manage.py changepassword admin
FreeNAS will then prompt you to enter a new password.
The Setup: Building Volumes
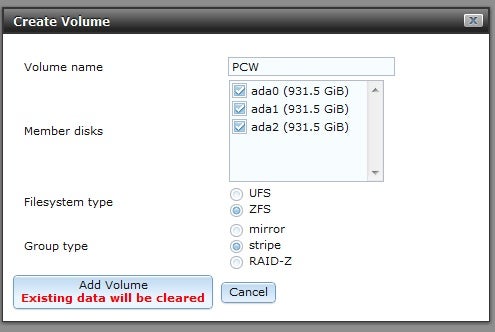 Once you’re logged in, the first thing you’ll want to do is create the file system. Click Storage at the top of the menu bar, and then select Create volume. In the window that pops up, select all the drives you want to include, and give the volume a name.
You’ll have two options to choose from: UFS (Unix File System) and ZFS. We’re going with ZFS, as it offers support for numerous features designed for file servers, such as RAID support, snapshots, and file compression.
Depending on the number of drives in your machine, you’ll see a few new options. With three drives, I get a choice between mirror, stripe, and RAID-Z. Mirror duplicates data from one disc across the others, as RAID 1 would. Stripe splits files among the discs in the array, as RAID 0 would. RAID-Z is essentially a software implementation of RAID 5.
So what does all of that mean? With my three 1TB drives, selecting the mirror type gives me 1TB of total storage capacity, but preserves my data across all drives; if one drive fails, I can replace it and keep moving. Stripe gives me 3TB and a very fast response time; lose one drive, though, and all of that data is gone. RAID-Z is a sort of amalgam of the two: It gives me 2TB of space, and if one of the three drives fails, my data can be rebuilt from the remaining pair while I find a replacement.
Because I like to live on the edge, I’m going with the striped option. It isn’t the safest alternative, but I’ll squeeze out every bit of space, and I can always implement a safer, redundant backup solution later on.
Whatever you choose, be aware that any data on the discs will be wiped. Click Add volume, and moments later your file server is almost ready to go.
Sharing Your Files
You have your storage volume in place, so now you can fill it with photos of pets, as well as your legally acquired media.
FreeNAS makes it easy to share files with Linux, Apple, and Windows computers. You can create as many shared folders as you’d like--say, a Windows/Unix/Apple share for your movies and music collection, and an Apple-specific share for your Time Machine backups.
The first step is to enable the CIFS (Common Internet File System) service. ClickServices on the left, and then click the button for CIFS. Click the wrench next to the CIFS line to set your workgroup, assign other network and user permissions, or just give your NAS a readily identifiable name. You’ll be typing this name in to access your file server from Windows machines.
 On the navigation bar at the left, click the tab conveniently labeled Sharing. I’ll set up a Windows share as an example here, but the instructions for Linux and Apple are fairly similar.
Click Add Windows Share, and give it a name in the window that pops up. Click the drop-down menu next to 'Path' to assign your NAS to an address that Windows will be able to find. Select Browsable to Network Clients, as this feature will let you use the Windows Explorer menus to access your NAS as you would any other folder on your PC.
The other options I’ve selected aren’t especially secure. I want this NAS to be readily accessible to everyone, though, and I have a reasonable level of trust in my coworkers.
And we’re done! Just click Start on a Windows machine connected to your network, and in the Run text box (immediately over the Start icon) type \\YourNASnamehere and press Enter. Windows will connect to the NAS, and you can start dropping files in. Feel free to tuck the NAS out of the way. Mine isn’t even connected to a display, as everything we need to do can be handled in a browser on any machine on the network.
No comments:
Post a Comment